Showing posts with label Fruit. Show all posts

Friday, August 27, 2010

Peach Chutney

Rounding out a shipment of local produce, I had a bunch of peaches that were reaching past-prime status.  I hate... absolutely detest.. wasting food, so I came up with a plan to utitlize the over-ripened fruit.

With my Ball jar kit in tow, I set out to make a delicious chutney that would be an excellent addition to chicken, pork, or even atop cheese and crackers.


Peach Chutney
  • 6 ripe peaches
  • 1 red onion, finely chopped
  • 1/2 cup brown sugar
  • 1/2 cup white wine vinegar
  • 3 T fresh ginger, minced
  • 1/2 tsp salt
  • 1 jalepeno pepper, minced
  • 1/2 cup fresh Italian parsley
  • 2 T fresh lime juice
Bring first 6 ingredients to a boil in a small saucepan.  Reduce heat so low, cover and simmer for 45 minutes.

Stir in jalepeno and cover again.  Simmer for an additional 5 minutes.

Remove from heat.  Stir in parsley & lime juice and cool to room temperature before serving.

Enjoy!


Photobucket

Friday, July 23, 2010

Lemon Basil Cake

As I've mentioned before, I am growing several basil plants on mt back deck.  I have been trying to make things, other than pesto, to use it up.

This Lemon Basil cake is moist, delicious, and a fantastic summer dessert.  Be sure to try it!


Lemon Basil Cake

  • 2 & 1/2 cups all-purpose flour
  • 2 & 1/2 tsp baking powder
  • 1/2 tsp salt
  • 1 stick unsalted butter, softened
  • 1 & 1/2 cups sugar
  • 2 large eggs
  • 1/2 cup chopped fresh basil
  • 1 & 1/2 tsp. lemon extract (found at food specialy stores - if you cannot find, use 2 T of lemon zest instead)
  • 1 teaspoon vanilla extract
  • 1 cup plus 2 T buttermilk
  • 1 & 1/2 cups mixed berries, such as raspberries and blackberries

Preheat the oven to 375°F. Lightly oil a 9-inch springform pan.

In a medium bowl, combine the flour, baking powder, and salt.

In an electric mixer, beat the butter and sugar in an electric mixer on medium speed, until creamy. Add the eggs, basil, lemon zest, and vanilla extract. Beat until blended.

Add the flour mixture, a third at a time, alternating with the buttermilk and beating on low speed until smooth.

Pour into the prepared pan. Bake for 35 to 45 minutes, or until a wooden pick inserted in the center comes out clean. Cool in the pan on a rack for 10 minutes. Remove the sides of the pan and cool completely.

Place the cake on a serving plate and top with the berries.


Photobucket

Monday, July 5, 2010

Grilled Mahi Mahi with Pineapple and Avocado

I have to admit, I am not always a super-adventurous foodie.  I love to try new things, but have always been weary of fish.  I can throw back a tuna tartare with the best of them, but when it comes to cooked fish, I have always been hesitant.

Ryan loves fish and often wishes I would try making it.  During a recent trip to Whole Foods, I bit the bullet and purchased 2 Mahi Mahi fillets.  I knew this was one of the milder tasting varieties that I have sampled before and not been adversed to, so I rolled up my sleeves and bit the bullet.  Actually, I doubt I was wearing sleeves, it was 90+ degrees outside, but you get the idea...

A success!  Not only was it tasty, but Ryan could not have been happier.  He even came home during his lunch break today to tidy up his mess in the basement.  I took that to say, "I really appreciate the yummy fish!"


Grilled Mahi Mahi with Pineapple and Avocado

For the fish:
  • 2 Mahi Mahi steaks or fillets (about 6 ounces each)
  • 2 tsp olive oil
  • 2 tsp fresh lime juice
  • 1 tsp minced fresh ginger
For the topping:
  • 1 fresh pineapple, peeled and diced
  • 1 medium ripe avocado, peeled and diced
  • 1/3 cup finely chopped red onion
  • 3 T fresh lime juice
  • 1 tsp grated lime peel
  • ¼ tsp salt
  • 1 pinch black pepper

Rinse Mahi Mahi in cool water and pat dry. Combine oil, lemon juice and ginger and coat both sides of fish. Refrigerate for up to an hour.
Heat grill to medium-high, about 350 degrees.
Combine topping ingredients and set aside.
Add fish to hot grill for 5 minutes on first side.  Flip, and grill 5-10 more minutes on second side, until internal temp is 160 degrees.
Remove from grill to plate and top with pineapple and avocado.  Serve with white rice or polenta.
Enjoy!


 Photobucket

Friday, June 18, 2010

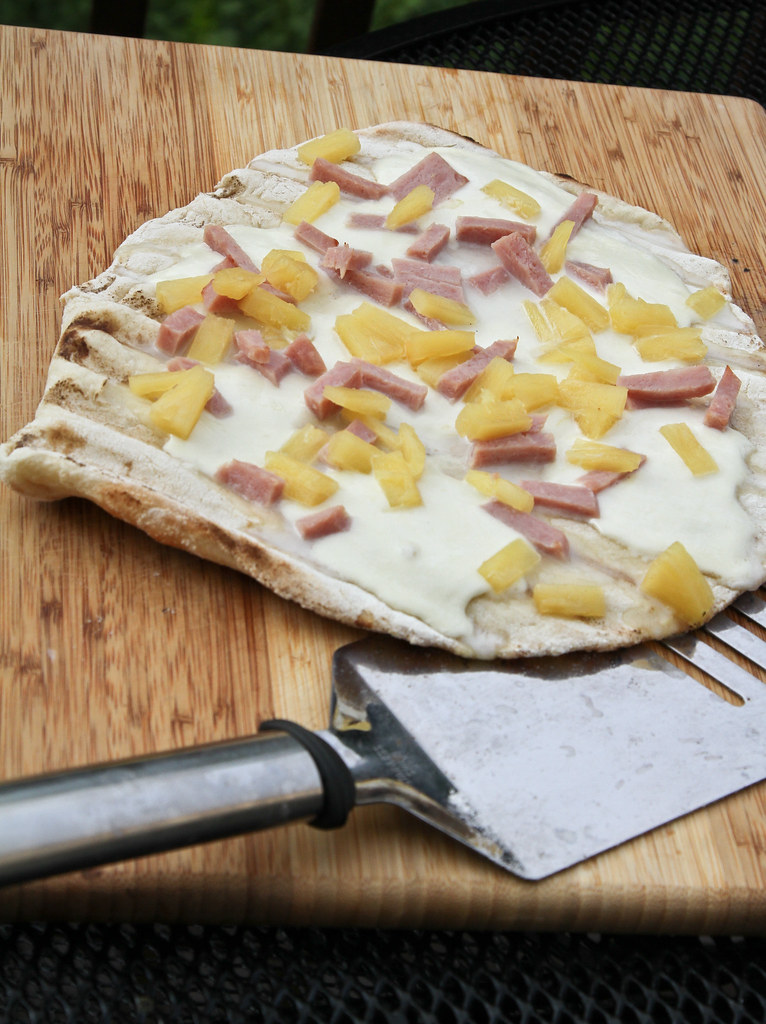
Pizza Dough & Grilled Hawaiian Pizza

Making pizza is one of my favorite ways to get creative in the kitchen.  The possibilities are endless, from the toppings you add to the way you cook it.

For the pizza dough:  you can buy pre-made crusts like Boboli or rolled dough in a can like Pillsbury, which are definitely great for a super quick, super simple meal.  Trader Joe's sell pizza dough or you can even ask your local pizzeria if you can buy a ball or two of dough.  Or, if you have a bit of extra time, you can make your own dough.  It may sound a bit more involved than what you're looking for, but believe me nothing could be simpler.

Some tips:
  • Freeze extra extra dough for later use by placing a ball of dough on a parchment-lined cookie sheet in the freezer for 45 minutes.  Transfer the dough to a freezer Ziploc bag and store fr up to 6 months.
  • Let dough come to room temperature before using.  If dough is too elastic and keeps shrinking back when you try to roll it out, let it sit out for 15 minutes and try again. 
Here is the pizza dough recipe I use:

Pizza Dough (makes 2 balls for about two 12-inch pizzas)
  • 1 cup hot tap water
  • 1 packet active dry yeast
  • 1 tsp sugar
  • 2 tsp extra virgin olive oil, plus more for bowl and brushing
  • 1 tsp. kosher salt
  • 2 & 1/4 cups all-purpose flour, plus more for work surface
Pour water into medium-large bowl.  Whisk in sugar and sprinkle yeast on the surface of the water.  Let stand until foamy, about 5 minutes.

Whisk oil and salt into yeast mixture.  Add flour and stir with a wooden spoon until incorporated.  The dough will appear a bit dry. 

Turn out to a floured work surface (a large wooden cutting board or your counter works best).  Knead for a couple of minutes, until until dough comes together in an elastic ball.

Transfer to an oiled medium-sized bowl.  Brush top with additional oil and cover with a dampened cloth.  Place in a warm, draft-free area to let rise.  After 45 minutes, punch dough down, recover, and let rise an additional 30 minutes. 

Divide dough in half to create 2 balls.  Freeze or refrigerate unused portion, if not using.

One way I LOVE to use my pizza dough is to grill it.  I roll my dough out on a wooden cutting board that is well floured so the dough will just slide right off onto the hot grill.  It only takes a few minutes to cook a pizza this way, and the flavor is out of this world!

Grilled Hawaiian Pizza
  • 1 ball pizza dough
  • 1 ball fresh mozzarella, sliced into 1/4" slices
  • 1/2 cup diced cooked ham (I freeze a few thick slices when I bake a ham for things just like this!)
  • 1/2 cup diced pineapple
  • Extra virgin olive oil
Heat grill to medium-high.

Roll out pizza dough to a 12" round circle (it doesn't have to be perfect!) on a floured cutting board.  Slide dough onto hot grill and cook for 1-2 minutes, until light grill marks appear on underside. 

With a large spatula, carefully flip dough to other side.  Brush olive oil on the top side.  Top with cheese slices, ham and pineapple.  Close the grill and cook just until cheese is melted, about 1-2 minutes longer.

Slice, serve, and enjoy!

Photobucket

Tuesday, May 25, 2010

Chicken with Papaya BBQ Sauce

Chefs, home cooks, and anyone in between rejoice!  The Cooking Channel has arrived!

This sister channel to the Food Network has all that the Food Network (cluttered with reality-style programming as of late) has been missing.  Plain and simple - cooking shows.  No mundane shows on the history of cotton candy, no timed gingerbread house-building contests or tours of the fattiest restaurants in America, no babbling Southern women whose idea of cooking is to throw butter into anything.  Good, old fashioned cooking shows that inspire people to head to their kitchen and create something spectacular.

Although I think the name leaves a bit of creativity to be desired, I am thrilled to welcome this new station to my cable box.  In its beginning stages, it has a mix of great new talents, some great old talents (Julia Child), mixed with a few Food Network elite reruns (Giada, Tyler, Dave, Michael, etc).

On Everyday Exotic, chef Roger Mooking made a jazzed up chicken dish that I simply had to try.  Ryan adores papaya, so I was excited to see how he would react to this dish.  I omitted making the spiced cashews, this is a weeknight after all!   Perhaps I will try making this step when I am not quite as rushed.

Serve this dish with coconut rice and a tropical salad for a delicious, special treat! 

** Tip- this recipe makes a lot of BBQ sauce.  Save the rest for later by jarring it!  I just learned how to jar something and get that vacuum seal!  Here's how- pour the remaining hot sauce to the top of a clean glass jar, screw the lid on and put in your refrigerator.  It's that easy!  Hot air is less dense than cold air, so it occupies more volume than cold air.  When the air cools down. it will create a vacuum seal.  Make sure the dimple on the lid is concave before storing.


Chicken with Papaya BBQ Sauce

Marinade
  • Seeds of 1 large papaya
  • 1 clove garlic, minced
  • Zest and juice of 1 lime
  • Zest and juice of 1 lemon
  • 1/4 cup canned coconut cream, (use the creamy part skimmed from the top of the can)
    • Save the remaining coconut milk to make coconut rice
  • 2 tablespoons freshly chopped cilantro leaves
  • 1 tablespoon minced fresh ginger
  • 1 tsp salt
  • 1/2 tsp pepper
  • 4 boneless, skinless chicken breasts

Papaya BBQ Sauce
  • 1 tablespoon vegetable oil
  • 1 sweet onion, finely diced
  • 3/4 cup sugar
  • 1 Scotch Bonnet pepper, seeded, deveined and quartered
  • Zest and juice of 2 limes
  • Zest and juice of 1 lemon
  • 1 cup water
  • 1/2 cup seasoned rice wine vinegar
  • 5 cups large diced papaya
  • 2 tsp kosher salt

Chicken
  • 1 tablespoon vegetable oil, plus more as needed
  • 4 marinated boneless, skinless chicken breasts (as per marinade recipe above)
  • 1/4 cup Papaya BBQ Sauce, recipe follows
  • 1 tablespoon fresh cilantro leaves, for garnish, optional 

For the marinade:

In a bowl, combine the papaya seeds, garlic, lime zest, lime juice, lemon zest, lemon juice, coconut cream, cilantro, and ginger, and mix thoroughly.
Add the chicken breasts to the bowl, and toss to coat in the marinade. Cover the bowl with plastic wrap, and place in the refrigerator to marinate for a minimum of 1 hour or up to 24 hours.

For the BBQ sauce:

Heat the oil in a pot over medium heat, and add in the onion. Cook, until the onions are translucent, stirring continuously to ensure the pieces do not brown.

Sprinkle the sugar, scotch bonnet, lime zest, and lemon zest over the onions, and stir until the sugar dissolves. Pour in the lime juice, lemon juice, water and vinegar. Bring the ingredients to a boil. Add in the diced papaya, and adjust the seasonings with the salt, if desired.

Bring the mixture to a boil again, reduce the heat, and allow the mixture to simmer for 15 minutes. Take the pan off the heat, and let the mixture cool slightly. Carefully transfer the mixture to a blender, and puree the sauce until smooth. Transfer the BBQ sauce to a bowl, and set aside.

For the chicken:

Heat and a grill over medium-high heat and lightly grease the grate with oil.

Remove the chicken from the marinade, and lay the breasts on the hot grill. Discard the marinade.

Baste each chicken breast with 2 tablespoons Papaya BBQ Sauce, and continue grilling, turning once and basting occasionally with the remaining sauce, until the meat is cooked through.


Photobucket

Monday, May 10, 2010

Orange-Pineapple Marinated Grilled Chicken with Mango Salsa

Grilling chicken is something that I feel I have perfected over the past few years.  At first, I would overcook it (or perhaps dreadfully UNDERcook it) and it would get dried out or just not right.  Finally, I've come up with a set of rules that ensures perfectly grilled, moist & tasty chicken.

 #1  Marinate your chicken to add flavor and keep it moist.  You can use anything from fruit juice to soy sauce, but make sure you let it sit in the marinade for AT LEAST 1/2 hour.

#2  Season your chicken.  Make sure you are generous with salt & pepper BEFORE you cook your meat!

#3  If you're not using a marinade, make sure you brush your chicken on both side with canola oil before you throw it on the grill.  Canola oil is a light oil that is high in monounsaturated fat (good for you!) and low in saturated fat (the bad stuff!), so it's actually the healthiest choice for you use!  Plus, it has a high smoking point so it's perfect for the grill.

#4  Once you have your meat on the grill, don't keep flipping it around.  Cook on one side to allow grill marks to form, then flip once more to complete cooking on the other side.  If the meat sticks to the grates, it is NOT ready to be flipped!

 #5  Using a meat thermometer, cook to an internal temperature of 150-160 degrees. Transfer to a plate and tent with foil for 10 minutes.  This allows all of the juices to redistribute so they won't run all over your plate, and the chicken will continue cooking (internal temperature will actually rise).  Bringing internal temps too high will result in dry, tough chicken.

Armed with these tips, you're on your way to cooking some delicious poultry!

Orange-Pineapple Marinated Grilled Chicken with Mango Salsa
  • 4 chicken breast halves
  • 1 cup orange-pineapple juice
  • 1 tsp salt
  • 1/2 tsp pepper
 For salsa
  • 1 ripe mango, peeled, pitted, and diced
  • 1 red bell pepper, diced
  • 1/2 medium red onion, finely chopped
  • 1 jalapeño chili, minced
  • 3 Tbsp fresh lime juice
  • Salt and pepper to taste

In a large plastic bag, pour juice and season with salt & pepper.  Add chicken breasts and massage.  Marinate in refrigerator for 1/2 hour to 2 hours.  Do not marinate for longer that 2 hours as the acid from the orange juice will begin to "cook" the chicken.

In the meantime, to make the salsa, combine all ingredients and let sit for 30 minutes for juices & flavors to combine.

Heat grill to approximately 375 degrees (medium high).  Grill chicken on first side for 7-8 minutes.  Flip to other side and cook approximately 7 minutes longer, until a meat thermometer inserted to the center reads 150. 

Remove from grill and tent with foil for 10 minutes.

Serve topped with mango salsa. 

Photobucket

Saturday, September 5, 2009

Grilled Pork Tenderloin with Raspberry-Chipotle Dressing

Dear Faithful Readers:

I am sorry that it has been so long since I've posted. I was on a brief hiatus, but rest assured, I am still here!

That being said, I'd like to share a recipe that I made last night for dinner with the girls. It was an excellent summer meal and very easy to make. The recipe is from the June/July issue of Cooking Pleasures Magazine.


Grilled Pork Tenderloin with Raspberry-Chipotle Dressing

  • 1 (1 1/4 lb.) pork tenderloin
  • 1/4 tsp salt
  • 1/8 tsp freshly cracked black pepper
  • 1/3 cup raspberry preserves
  • 1/4 cup mayonnaise
  • 1/4 cup fresh lemon juice
  • 2 to 3 tsp minced chipotle chiles in adobo sauce*
  • 8 cups lightly packed baby spinach
  • 1/2 cup fresh raspberries
Heat grill to medium/medium-high.

Sprinkle pork with salt & pepper, cover and grill for (turning to brown on all sides) 12-15 minutes or until internal temperature reaches 145 degrees (pork will be a little pink in center, don't be afraid! This is completely safe and much tastier than cooking the daylights out of your meat!)

Remove pork from grill and tent with foil. Let rest for 10 minutes before thinly slicing to allow juices to redistribute.

Meanwhile, whisk preserves, mayonnaise, lemon juice, and chiles in medium bowl.

Arrange pork over spinach (I did not use spinach, but served over rice with a side of asparagus & a salad). Top with dressing, sprinkle with fresh raspberries.

*Chipotle chiles in adobo sauce can be found in the Hispanic foods section of the supermarket.

PS- I apologize for my lack of quality photos in recent posts... you can surely tell the difference between my pictures (amateur) and Ryan's (aka "the boyfriend" aka "the multi-talented man"!


Photobucket

Tuesday, July 28, 2009

Enjoying the fruits of summer...

I have been reading Animal, Vegetable, Miracle by Barbara Kingsolver and it has really changed the way I think/buy/eat. The book discusses not only eating organically, but eating locally - which basically equates to eating only items that are grown yourself or grown and sold within a small radius of your home.

The book has a lot of valuable lessons in it. You would not believe the amount of fossil fuels that are used in growing and transporting food! It's an amazing read and I highly recommend it. In it, the author lists tips on living "green" as well as fantastic recipes.

After a recent trip to a farm stand, I tried making her Melon Salsa for dinner, changing a few things to suit my tastes. The results were not only one of the most delicious things I have ever tasted, but I was also extremely satisfied using locally grown produce and I even got to use some mint from my garden (ok, it's more of a few flower pots of herbs rather than a garden - townhome living thwarts growing the garden I dream of...)

For the meal, I then served grilled chicken topped with the melon salsa. I served it with a side of couscous and a salad. I made the couscous with chicken broth, instead of water, and added in some diced green onion for extra flavor.


Melon Salsa
  • 1 medium cantaloupe
  • 1 red bell pepper
  • 1 small jalapeno pepper
  • 1/2 medium red onion
  • 1/4 cup fresh mint leaves
  • 1-2 T honey
  • 1 T apple cider vinegar
Dice cantaloupe and red bell pepper into 1/4" pieces.

Finely mince onion, jalapeno and mint.

Whisk together honey and vinegar in a bowl. Toss all ingredients in bowl and stir to combine.

Cover and refrigerate at least 1 hour before serving. Excellent served over chicken or fish.


Photobucket

Saturday, July 4, 2009

Homemade Popsicles, Perfect for Summer!


I recently bought some really cute popsicle molds at 5 Below and finally cleared enough room in my freezer to try them out! When the summer heat kicks in and you are looking for a healthy, cool snack, try these delicious treats:

Watermelon-Berry Popsicles (makes 6)

  • About 1 lb of seedless watermelon, cubed
  • 1/4 lb strawberries, hulled and quartered
  • 1/4 cup sugar
  • 1 T lime zest
  • 1 T fresh lime juice
Equipment:
  • Popsicle molds

Working in batches, puree watermelon in a blender. Strain through a fine-mesh sieve into a large bowl (discard solids).

Puree strawberries. Add sugar, zest and juice and pulse until sugar has dissolved. Add to bowl with watermelon juice and stir to combine.

Pour mixture into popsicle molds.

Freeze until solid, 2 & 1/3 to 3 hours.

*Tip- to remove the pops from the mold, run the mold under warm water for a few seconds.

Enjoy!


Photobucket

Saturday, June 13, 2009

GUEST SPOTLIGHT - Lemon Bars

This is a little something new I am going to try. As I've said before, I have many friends and family members that are also fanatical cooks. I'd like to dedicate a segment for them and share some of their favorite recipes.

Michele, Ryan's sister-in-law, always contributes something wonderful to eat whenever the family gathers (in many cases, she is the hostess... with the mostess! She often is the host of wonderful spreads in her gorgeous kitchen!). Something that she makes that always goes over very well are her lemon bars. As I've said before, I am not a huge dessert person, but when it comes to these lemon bars, I'm a HUGE fan!


Lemon Bars with Blueberries

  • 1 pkg Duncan Hines® Moist Deluxe® Lemon Supreme Cake Mix
  • 3 lg eggs
  • 1/3 cup butter flavored shortening
  • 1/2 cup granulated sugar
  • 1/4 cup lemon juice
  • 2 tsp grated lemon peel
  • 1/2 tsp baking powder
  • 1/4 tsp salt
  • 1 cup blueberries


Preheat oven to 350ºF.


Combine cake mix, 1 egg and shortening in a large mixing bowl. Beat at low speed with electric mixer until crumbs form. Reserve 1 cup.

Pat remaining mixture lightly into ungreased 13x9-inch pan lined with parchment paper.
Bake 15 minutes or until lightly browned, checking often in the last 5 minutes to make sure they aren't browning too quickly.

Combine remaining 2 eggs, granulated sugar, lemon juice, lemon peel, baking powder and salt in medium mixing bowl. Beat at medium speed with electric mixer until light and foamy. Pour over hot crust.

Top with blueberries and sprinkle with reserved crumb mixture.
Bake 15 minutes or until lightly browned.

Cool in pan. Cut into bars.


*Tip- These bars are also delicious using Duncan Hines® Moist Deluxe® Classic Yellow Cake Mix.

After Michele cuts the bars, she places them in cupcake wrappers for a nice presentation. Although some don't get as far as the wrappers... Ryan manages to pop a few in his mouth as soon as he has the opportunity!


Photobucket
Related Posts with Thumbnails